Reflections On The Reflecting Telescope
By
Randy Boswell
It is a given that the reflecting telescope is the workhouse of astronomy. It established itself on the professional level due to the fact that it did not suffer from the limitations of aperture size as is the case with refracting telescopes. And, on the amateur level due to less cost per aperture size. This aside, much of the popular accounts do not reflect (yes, pun intended) accurately on the origin and development of the reflecting telescope. For example, scores of entry-level science and astronomy books claim Isaac Newton as the inventor of the reflecting telescope. However, such is not the case. This is not a knock, nor does it detract from Newton’s genius. It is like the lawyers say: you have to read the fine print.
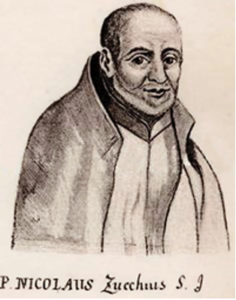
The credit for the first reflecting telescope goes to the Italian monk, physicist and astronomer Niccolo Zucchi (1858-1670) [1], long before Newton constructed his reflecting telescope in 1668. It is said that Zucchi developed a keen interest in astronomy after a meeting with the famous astronomer Johannes Kepler. Around 1616, Zucchi created a basis reflecting telescope. Zucchi’s telescope involved a bronze primary mirror to focus the image and a concave lens as an eyepiece to view the image. Zucchi’s telescope failed to yield satisfactory images. The factors were the angle the mirror was tilted at to deflect the focused image a measure to the side towards the observer, along with the observer’s head partially obstructing the incoming light from the viewed object, and the possibility that the mirror did not adequately focus the image. Consequently, Zucchi further construction on his reflecting telescope. Nevertheless, in 1652 Zucchi published his book, “An optical philosophy and the experimental nature of the bases determined”, in which he described his experiments with his reflecting telescope. His book later inspired scientists James Gregory and Isaac Newton to pursue improved designs for reflecting telescopes [2].
The earliest design for a practical reflecting telescope goes to the Scottish mathematician and astronomer James Gregory (1638-1675) [3]. Gregory’s design predated Newton’s reflecting telescope by five years. The blueprint for Gregory’s telescope was set forth in his 1663 book, “Promotion of Optics”. Gregory pointed out that a reflecting telescope with a parabolic mirror would correct spherical and chromatic aberrations endemic to refracting telescopes of his day – a finding that preceded Newton’s conclusions.
Gregory’s design placed a secondary concave mirror with an elliptical surface past the focal point of the parabolic mirror, reflecting the image back through a hole in the primary mirror where it could be viewed. Gregory’s proposed design became appropriately known as the Gregorian telescope. However, Gregory had no telescope building skills. Others eventually constructed Gregory’s telescope many years later. However, the Gregorian telescope is seldom used today due to the fact that later telescope designs proving more efficient. Despite this, Gregory’s basic design is used in today’s radio telescopes – the most famous being the Arecibo Radio Telescope in Puerto Rico [3].
Regarding Newton’s 1668 reflecting telescope, it marked a turning point – of sorts. Newton’s design employed a primary mirror to capture light and a smaller secondary mirror to reflect the light out the side of the telescope to a magnifying eyepiece. This, along with the fact that his telescope was easier and less costly to construct than Gregory’s telescope eventually made Newton’s design popular with amateur astronomers and was thenceforth known as the Newtonian Reflector. But there was a problem.
While Newton’s telescope eliminated the problem of chromatic aberration it still suffered from spherical aberration, resulting in a blurry image caused by the spherical shape of the primary mirror. And this was the problem. Newton tried to grind a parabolic mirror in 1666 to eliminate this problem but was unable to do so because the technology was not available at the time. This resulted in Newton’s telescope becoming unusable [4]. The net outcome was that only two were built and given to the Royal Society if only for the purpose of proving the concept of a reflecting telescope [5].
It was not until more than fifty years later that the English inventor and mathematician John Hadley 1682-17440 ground the first parabolic mirror in 1721, thus produced the first practical reflecting telescope [4]. Hadley’s techniques has since been used, notably by the late John Dobson (1915-2014), the inventor of the widely-popular Dobsonsian telescope.
The succeeding years after Hadley’s innovation witnessed new variations on the reflecting telescope such as the Cassegrain and Schmidt-Cassegrain designs that we know today, for example. Burt the salient point is that the conception and prototype of the reflecting telescope occurred before Newton’s telescope. And, moreover, long after Newton built his telescope did the reflecting telescope prove itself and become the mainstay in professional astronomy. And this is, well, something to reflect on.
Notes
- Will Kaliff, “How Newton’s Telescope Changed The World”, March 23, 2018, www.Insightobservatory.com
- “Niccolo Zucchi: Italian astronomer,” n.d., www.Britannica.com
- Jonathan Powell, Rare Astronomical Sights and Sounds, 1st Edition, (Cham, Switzerland: Springer International Publishing AG, 2018).
- Mel Bartels, “Think you know who invented the reflecting telescope?”, January 2014, www.bbastrodesigns.com
Image
Wikipedia contributors. (2020, November 19). Niccolò Zucchi. In Wikipedia, The Free Encyclopedia. Retrieved 17:16, December 17, 2020, from https://en.wikipedia.org/w/index.php?title=Niccol%C3%B2_Zucchi&oldid=989594139
Editor’s Trivia Note: Lunar crater Zucchius is named after Niccolo Zucchi


